.....and all the other stuff:

I also knit, crochet, cook and other things, so watch out :-)

Monday, 11 July 2016

The story of a pair of sneakers/ slippers

I have just finished yet some slippers - Converse like,  and I  thought it might be an idea to tell you how they are made.
I am using sock wool for needles size 3 mm and acrylic yarn for the soles. In all I pay 50 dkk (4-5 USdollars/ 7 Euros) for the materials. I tried to count the hours I use to make them. Not that it matters, because If I was supposed to charge at least minimum wages, they would not be able to sell anyways.... haha......

Here is the story:

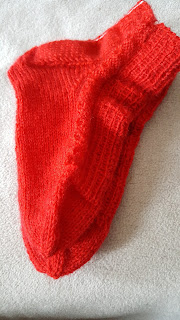
First I make a pair of socks and add holes for the laces later, it is the first 10 hours.
Then I crochet "stripes" on the back and along the holes.  Approx.1 hour
Then the soles. 2 hours

On the soles I knit the bottom edges and the tip of the toe. Before that I had to fasten all the yarn ends, another 2, 5 hours.
Then I attach the soles to the socks, first with some fine stitches along the edges in front and after that the rest of the sole with sewing thread in order to make the seam invisible. 1 more hour

Finally I can see the light at the end of the tunnel, only the logos and the laces left to make, yet 45 minutes.
Finally..........well even putting the laces in takes 15 minuttes.


I all I have used 17,5 hours on a pair of Converse sneakers/slippers.
But I have enjoyed myself, so when I sell them in Denmark I have chosen only to charge 200 DKK (35-40 USD or 28 EUROS).
Which means, that more people are happy about their new slippers 
( ps. As I have a lot of experience I better warn you if you are new to this, count on at least 5 - 8 extra hours work. The pattern is found here on the net)

Tuesday, 17 May 2016

A productive crafter

I am so lucky, because I can do what ever I want when ever I want.

...and I have always loved  to make something, it could be baking buns for breakfast, a very unhealthy cake with load of whipped cream...haha... or just a nice meal.

....oh yes, and my crafts.... I don't think I could live without my sewing machines, my knitting and crochet needles and all the other stuff I have, such as buttons, thread, stickers, laces, zippers and so on....
...and another thing...
 I put up photos on Facebook on my site called  VibbesWorld, and the best part of that is, that people send me photos, asking if I can make this or that.... and I I love a challenge (and I easily get bored, if it is the same thing I will have to do over and over - all though I made a blanket of grannysquares once...long time ago.....)
I just delivered at special hat to a friend yesterday. He sent me this photo of a Scottish Tam and "accidently" I had some nice wool from the Faroe Islands at my storage in the attic, so I started at once:


This was the photo I got from him, and I found the pattern on the net, my luck I can read the english patterns, though I am Danish!
The yarn was as thin as sewing thread, so I knitted with  5, and it was tangling all up, during, until I found a way to separate them by putting each skein in a bowl. The result looked like this.......but


It wasn't quite finished yet. I had to felt it. It is not that easy to see the actual fabric/material on the photo but this was the reason. First knit, then felt.
I did that by hand in almost boiling water and soap and lots of hard rubbing!!!!!!
At the end I threw it into the washing machine to make it felt into the measurements iI wanted.


And here you have the result... I delivered it yesterday, and I can tell you it looked great on the happy recipient.

Now the next projects are waiting:
A cardigan, kitchen cloths, which I always bring in my handbag, and a Mermaid throw for a 7 year old

and I have  also cut out fabric for 3 t shirts and 3 shirts for my son


You see, I am never bored.... take care until next time.....


Thursday, 12 May 2016

Coated snap locks

Sometimes you really want to make something perfect, and today I have finished a jacket/frock coat.
For some time I have been lacking something to wear over my longer tops/ short dresses, so when I got lucky and found some really cheap fabric with  the right texture I went looking for a pattern in my large collection of BURDA magazines.
This is the result, and I even made the lining with the most lively fabric brought home from Malaysia last Summer.... and  the total price for it all, inclusive the rather expensive snap locks, that I , according to the pattern,  were going to use for the front.....is.... 150 DKK/ 28 USD.....


I started making my own clothes at the age of 13, and had a dream of becoming a designer of clothes.Then in the 9th grade I was able to work for a week in a professional sewing shop in Copenhagen. That was a really interesting experience, I was impressed when I saw they coated the snaplocks, in order to make them almost invisible!!.....a bit crazy in my oppinion at that time, but exactly today I was happy I remembered the process.

The snaps I had bought were big and shiny, and would definitely not be looking good on the coat as they were... and I have really been doing my best ... even sewn a lot by hand on the project.
I decided to coat them like this:
First I cut 2 circles of fabric a bit bigger, that the snaps

Then I basted all the way around the edge

Pulled the thread together and sewed over the wrinkled edges on the backside after making a small hole for the nob and hole in front of the snap

Can't you clearly see the difference?

This is how it looks on the jacket
...and on the front side I just attached a button to make it look finished

Friday, 15 April 2016

How to make a Pattern from your favourite old T-shirt


Everybody probably have a T-shirt, that they love, which fits and has the right neckline, and now is sligthly worn.......
Here is the way to make a new pattern so you can make a new t-shirt again and again.

You will need a pencil, a big sheet of paper, that could be a newspaper, wrapping paper, a leftover from a papertable cloth or what ever you have (tape some printing sheets together)......

Here we go:
1.Place the t-shirt folded along the side of the paper, be sure the shoulderline and the sides are totally flat.

2. Mark along the sides, the shoulder and the neckline back
3. Fold the sleeve against the body and place your fingers along the seam, now you can mark the opening by following your fingers.

4. Do the same along the neckline in front. use the fingers as markers and draw.


5. Remove the t-shirt from your new pattern and place it again on the paper with the sleeve placed flat . Be sure sure you have enough room to your right on the paper nowa s you only draw a half sleeve, and in order to make it a whole sleeve pattern you will have to fold the paper.
Now you draw around the sleeve in the top, same method as with the neckline. Continue along the sideseam and the bottom. until you reach the middle of the sleeve where it is folded..

6. You should now have these drawings on your paper.

7.Cut out the front/back piece and fold the paper along the middle of the sleeve drawing.... now you can cut a whole sleeve pattern:


8 .As you know, there is both a front and a back on a t-shirt and you only have one pattern piece you will have to draw an extra "top" with the neckline.  I have drawn the back and cut out the front on the whole patternpiece. I have also made a pattern for a tank top by making the armscye deeper and the shoulder smaller.  ( haven't made the back pattern for that yet , but I will show you when I make one ) remember to make these "top-patterns" long enough, so you can use the armscye as marking points when you are cutting the fabric.


The pattern is ready... I will show you how to cut the fabric next time.... have fun.......

and well...... here's my first "copy" 
 I will also show how to sew it later......


Saturday, 20 February 2016

Take Care of Your Cords

An easy way to take care of your cords, to avoid them from curling up.....

Some years ago I visited my parents and as I was to use my mothers hand-held mixer I noticed this smart solution..... where she's got it from I don't know, but as I always have had problems with the cord of my mixer, it curled up and I was afraid it some day would break, I hurried to "steal" the idea.
I have used the empty toilet rolls as they were, but today I just decided to pimp one up for my sewing machine cord:

okay.... I added some tinfoil to the cord of the coffee maker:

But for my sewing machine I just made something nicer to look at. I did like this:

You need this: an empty toilet roll, some fabric (or paper) perhaps some decor and glue.

I used that sort of glue you also use for decoupage, a combination of glue and varnish.

Cut the fabric to fit around the roll and leave  ½ an extra inch at both ends to make a nice finish.
Glue and rolls on the fabric as you go, until the ends meet. Put some glue inside both ends and turn the fabric inside. (you can glue on the fabric too, to make it stick nicely inside)

I had some self-adhesive strawberries to put on and now the cords to my sewing machine will not curl up.

Enjoy, it doesn't take long to make.......